Wednesday, April 28, 2010

!!!!!!Warning!!!!!!
Get yourself a small bowl or you will eat the whole recipe.

As a huge fan of popcorn, I have been looking for the perfect caramel popcorn recipe. Well here it is! Enjoy

Caramel Popcorn by Shirley Ferre

16 cups popped popcorn (about 3/4 cup for my popper)
Large grocery sack or large bowl
1/4 c margarine or butter
1 c brown sugar (or white)
1/4 c corn syrup
1/2 t salt
1/2 t baking soda
1 t vanilla or 1/2 t other flavoring

Place popcorn in a lare grocery sack or large bowl.
Put butter, sugar, and corn syrup in a bowl and cook in microwave for 3 min on 50% power
or 2 minutes full power. Stir after each minute. Stir well. Add salt, baking soda, and flavoring and stir well. Pour over popcorn and stir well.
Close bag by folding the top over. Cook in microwave on high for 2 min or 3 min on 50%
power. Shake or stir after each minute. Be sure it doesn't burn. Pour onto cookie sheet
to cool. Separate kernels and store in airtight container.

Can make different flavors and mix in the container, also good with a bag of buttered popcorn
mixed in.

Earth Day

Today we made paper from recyclables.
First I had the kids rip paper into about 1-2 inch squares.

Then we put it in the blender with water.

The last step is to make it into paper. Which can be done a few different ways.
One way is to dump the mixture into a large flat dish, then use a screen and move it back and forth under the water until you get an even layer. Allow the water to drip off some, then press between 2 layers of towel. You can take the "paper" off at this point and allow to dry or you let it dry on the screen.

The other way I know of is to use some kind of mold (any mold will work jello, a pan you like, or just about anything as long as it has a bottom and sides- i.e. not a cookie cutter). After you have the pulp in the blender, use your hand to scoop some out. Place it in the mold, and press it in. Tip to let the water drain out. Repeat all steps until you have a relatively even coat in the bottom and sides of the mold. Make sure it is not too thick or it will take a long time to dry.

You can choose to let it dry in the sun, on the table, or you can use a fan (or dehydrater on low).

Variations- You can make seed paper. If using the first method, sprinkle the seeds over the paper when in the water. Mix with your hand a bit so that the seeds are covered with paper when it dries.
If using the second method, sprinkle seeds when you have a good layer of pulp in the mold, then cover with a thin layer of pulp.

I hope this all makes sense. Feel free to ask me any questions in the comments.

Tuesday, April 20, 2010

I built this, by myself! hehehe
The girls love this new swing.
Lexi was not so sure, but we got her to sit on it
long enough to get a picture.

I found this tutorial, and made this swing for my kids.
Although I made mine about 20 inches long and about 1 foot off the ground, since I was making it for the kids. I wanted to make it big enough for 2 kids to sit on it together or 1 adult.
It was quite easy to make, but cost more than expected (the rope was kind of expensive). The hardest part was drilling the holes for the rope. I had to pre-drill with a small bit, then use the largest one we had. It still wasn't big enough, so I tried to move the bit in a circle until the hole was big enough.

Sunday, April 11, 2010

FYI
The kids approve

Wednesday, April 7, 2010

Candied Orange Peels

Anyone who really knows me knows that I hate throwing things away. I love being able to use things that others (or I) would normally throw away, in a new way. So after the girls and I ate 3 oranges for breakfast, I was left with this.

So I went downstairs, hopped on the net, and looked for things to do with them. I found this, but nothing really stood out to me. Until... #9, which I clicked on and it brought me here.
So here is my take on Candied Orange Peels...
First off my peels were shorter, since I had not had this in mind to begin with. It turned out that it didn't matter. Also I agree, it did take about 75 minutes of simmering to turn them sufficiently translucent.


Another thing you should know about me is that, I am not very patient. The thought of waiting 4-5 hours let alone 2 days for them to dry did not appeal to me. So after letting the strips drip and dry for about 20-30 minutes, I transferred them to my food dehydrator. I turned it to the the lowest setting (95 degrees) and let the fan do the rest.
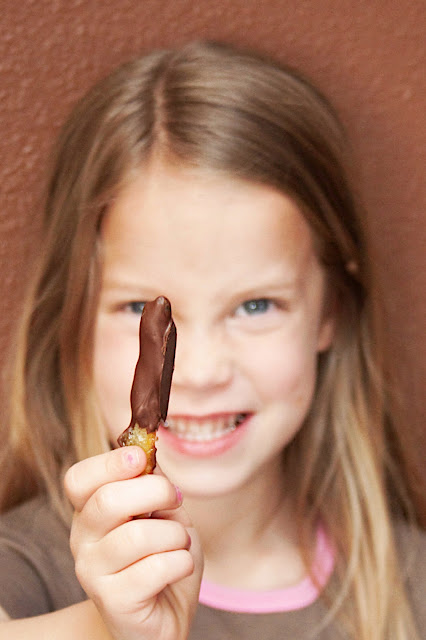
In about 2 hours they were ready to be dipped in chocolate. Also I tried something new. I chopped up some of the small pieces, put them in the chocolate, then dropped them in small piles to dry. They are really yummy, and a great way to use up the last of the chocolate.


On a side note... As afore mentioned, I hate throwing things out. So I decided rather than throw out the water when I blanched the oranges 3 times, I reserved the liquid. I added cinnamon, cloves, and about a cup of sugar. I let it boil and reduce, while the orange strips were simmering. Then after I took the oranges out of the liquid in the pan to dry, I added that to the mixture. I then added about 1-2 T Ultra Gel. I mixed it up, and put it in a jar. I plan to use it as a syrup for pancakes or waffles tomorrow, and as an added benefit it made my house smell AMAZING!!!!!

So there you have it, I hate to throw things out, I am impatient, and I love to try new things (mostly just to prove to myself that I can).